Yes, you can create stunning DIY industrial pipe bedroom decor without any special skills or tools. Black iron pipes from your local hardware store can become bed frames, shelves, lamps, and curtain rods that add cool style to your room. Most projects cost $50 to $300 and take just a few hours to build. This guide shows you exactly how to do it, from picking the right pipes to putting everything together.
Industrial pipe furniture brings that trendy loft look into your bedroom. Think exposed metal, clean lines, and a modern vibe. The best part? You don’t need to be a builder. The pipes screw together like Legos. And when you make it yourself, you save hundreds of dollars compared to buying the same items at stores.
In this article, you’ll learn which pipe projects work best for bedrooms, what materials to buy, how much everything costs, and simple steps to build your own industrial decor. We’ll also share tips from people who’ve done these projects so you can avoid common mistakes.
Why Choose Industrial Pipe Decor for Your Bedroom
Industrial pipe decor has become super popular, and for good reason.
The style fits almost any bedroom design. Whether you have a minimalist bedroom, modern space, or even a cottagecore bedroom, pipe furniture adds character without taking over the room. The dark metal creates nice contrast against light walls and bedding.
These pieces are tough. Really tough. Unlike some furniture that wobbles or breaks easily, pipe furniture can handle heavy use. A pipe bed frame can support serious weight. Pipe shelves hold tons of books. This stuff lasts for years.
Building with pipes also saves money. A ready-made industrial bed frame from a furniture store might cost $800 or more. Making your own costs around $150 to $250 for materials. That’s big savings.
Plus, you can customize everything. Want your nightstand taller? Use longer pipes. Need more shelves? Add another level. The threaded pipe system lets you adjust and change things as you go.
The Timeless Appeal of Industrial Style
Industrial style comes from old factories and warehouses that got turned into homes. People loved the exposed beams, brick walls, and metal pipes. Now, you can bring that same cool look into any bedroom.
The style works because it’s honest. Nothing is hidden or fake. You see the materials for what they are. This creates a relaxed, real feel in your space.
Industrial pipe furniture also mixes well with other styles. Pair it with wood for a rustic look. Add soft textiles for comfort. Use plants to warm things up. The pipes provide structure while letting your personality shine through.
What You Need to Know Before Starting
Before you buy anything or start building, let’s cover the basics. This will save you time and money.
Types of Pipes and Fittings
You’ll work with two main types of pipe:
Black iron pipe is the most common choice. It has a dark, matte finish that looks authentic. This is what you see in most DIY projects. The pipes come pre-threaded at both ends, making them easy to connect.
Galvanized pipe has a silver, shiny look. It costs a bit more but resists rust better. This matters if your bedroom gets humid. Some people also prefer the brighter metal look.
Both types work the same way. They screw into fittings to create whatever shape you need.
Essential Fittings You’ll Use
Fittings connect pipes together and let you change direction. Here are the main ones:
- Flanges attach to walls or floors
- Elbows turn corners at 90 degrees
- Tees create T-shapes for branches
- Caps close off open pipe ends
- Couplings join two pipes straight
- Nipples are short pipes for tight connections
Most hardware stores carry all of these in various sizes. The most common size for furniture is 3/4 inch diameter. This size looks good and stays strong.
Tools You’ll Actually Need
The good news? You probably already have most tools needed.
For basic projects, you need:
- Pipe wrench (one 10-inch wrench works fine)
- Measuring tape
- Level
- Pencil
- Sandpaper or steel wool
For mounting projects, add:
- Power drill
- Drill bits
- Screwdriver
- Stud finder
That’s it. No fancy equipment required. The pipes hand-tighten at first, then you use the wrench to snug them up. Simple.
How Much Does It Really Cost?
Let’s talk real numbers from actual hardware stores.
According to Home Depot’s pricing data, a 1/2-inch flange fitting costs around $4 to $5. A 90-degree elbow runs about $2. Pipe lengths vary, but a 48-inch piece of 3/4-inch black iron pipe costs roughly $15 to $20.
Here’s what common projects typically cost:
| Project | Estimated Cost | Build Time |
| Simple Clothing Rack | $50 – $80 | 1 hour |
| Wall-Mounted Shelf | $60 – $100 | 2 hours |
| Nightstand | $80 – $120 | 2-3 hours |
| Curtain Rod | $40 – $60 | 1 hour |
| Table Lamp | $30 – $50 | 1 hour |
| Bed Frame (Queen) | $200 – $300 | 4-5 hours |
These prices include pipes, fittings, and basic supplies. They don’t include wood if you’re adding shelves or tops. A nice piece of pine or oak board adds $20 to $50 depending on size.
Easy DIY Pipe Projects for Your Bedroom
Let’s get into specific projects you can build. Each one adds function and style to your space.
Build a Simple Pipe Clothing Rack
A clothing rack solves storage problems and looks great. It’s also one of the easiest pipe projects to start with.
What You’ll Need
- Two flanges (3/4 inch)
- Two 48-inch pipes
- Two floor flanges or caps
- One long pipe for hanging (5 to 6 feet)
- Four elbow fittings
- Wood screws for mounting
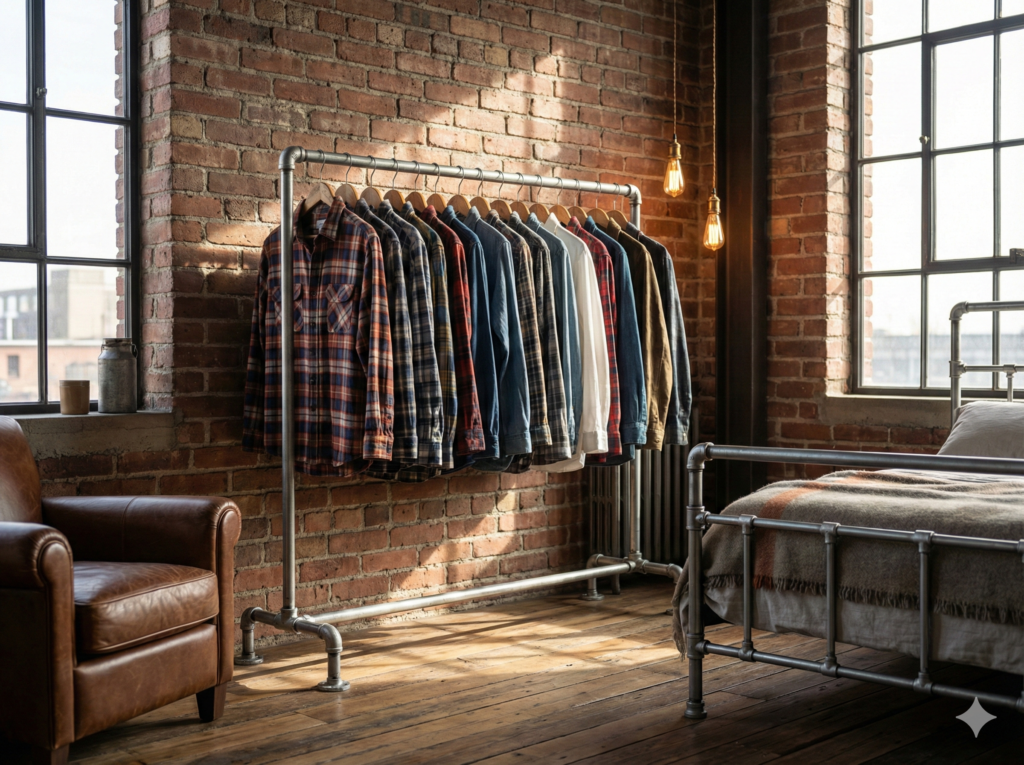
Step-by-Step Instructions
First, decide where your rack will go. Measure the space. You want at least 5 feet of width for hanging clothes.
Attach the floor flanges to your floor or mount the wall flanges to studs in your wall. Use a level to make sure they’re straight. Mark your screw holes, drill pilot holes, then secure the flanges with wood screws.
Screw the 48-inch vertical pipes into the floor flanges. These create your side supports.
Add elbow fittings to the top of each vertical pipe. Make sure both elbows point the same direction.
Connect your long hanging pipe between the two elbows. Hand-tighten everything first, then use your pipe wrench to snug it all up.
Test it with a few clothes hangers. The rack should feel solid and not wobble.
Tips for Success
Paint the pipes if you want a different look. Use spray paint made for metal. Rust-Oleum offers many colors specifically for metal surfaces.
Add wheels to make it mobile. Attach caster plates to the bottom flanges before assembly.
Include a lower shelf by adding another pipe level below. This gives you space for shoes or storage boxes.
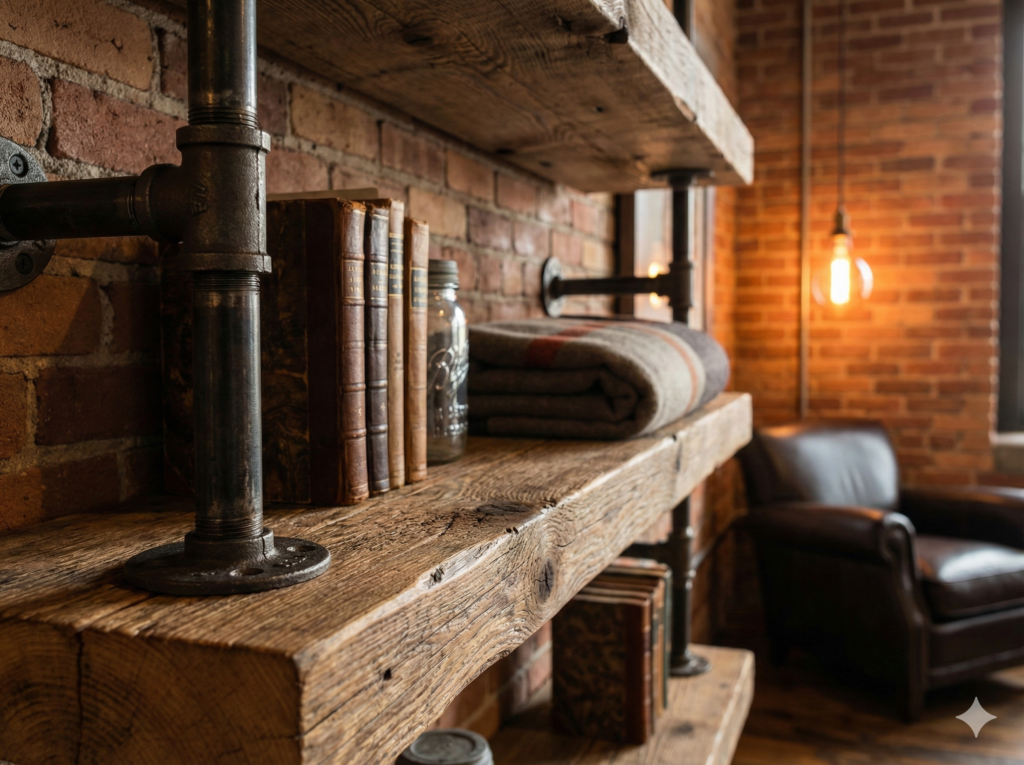
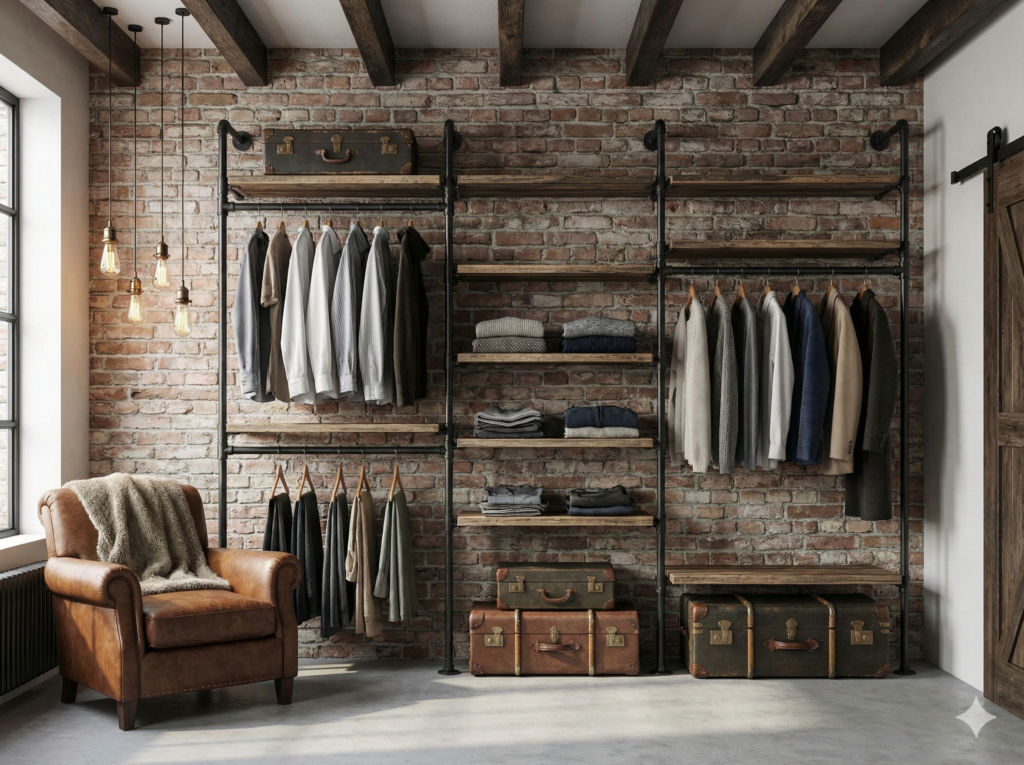
Create Wall-Mounted Pipe Shelves
Pipe shelves are super popular because they’re practical and cool-looking. They work great above your bed, desk, or anywhere you need storage.
Planning Your Shelf
Decide on the size. Most bedroom shelves run 24 to 48 inches wide. For depth, 8 to 12 inches works well for books and decor.
You’ll need shelves made of wood. Pine boards work great and stay affordable. A 1-inch thick board looks substantial and holds weight well.
Sand your wood smooth before you start. Stain or paint it if you want. Let it dry completely.
Materials Needed
For a basic two-tier shelf (36 inches wide):
- Six flanges
- Four 36-inch pipes
- Eight 10-inch pipes (for depth)
- Four elbow fittings
- Four tee fittings
- Two wood boards (36 x 10 inches)
- Wood screws
- Wall anchors or screws for studs
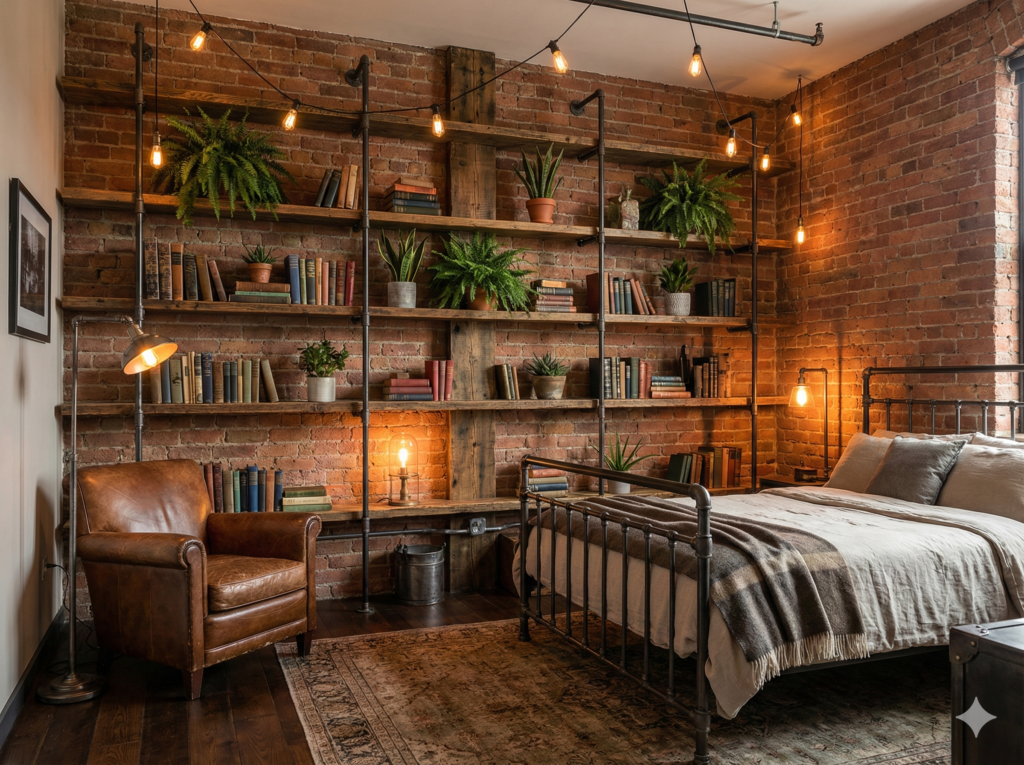
Building Process
Find your wall studs using a stud finder. Mark where you want the shelves to sit.
Attach the bottom flanges to the wall. Space them to match your board width. Use a level to get them straight.
Build your pipe frame before putting the wood on. Screw the vertical pipes into the flanges. Add elbows at the top. Connect the depth pipes. Test that everything fits level.
Place your wood boards on the pipe frame. The pipes support the board from underneath. You can leave the boards loose or secure them with small screws if you prefer.
Making It Look Great
Leave a small gap between the wood and the wall. This creates shadows and makes the shelf look like it’s floating.
Use reclaimed wood for character. Old barn wood or pallet boards add texture and a story to your room.
Paint the pipes a different color than your walls. Black pipes pop against white walls. Silver pipes look modern against dark colors.
Design a Custom Pipe Nightstand
A pipe nightstand brings industrial style right next to your bed. It’s also super easy to build.
Basic Nightstand Design
The simplest design uses four legs and two shelves. This gives you space for a lamp on top and books or items below.
Standard nightstand height is 24 to 28 inches tall. This puts the top level with most mattresses.
What to Buy
- Four 24-inch pipes (for legs)
- Eight 12-inch pipes (for shelf depth)
- Four elbow fittings
- Four tee fittings
- Four floor flanges or caps
- Two wood boards (12 x 16 inches)
Assembly Steps
Start with the floor flanges. These become the feet. Screw a 24-inch pipe into each flange.
About 12 inches up, add a tee fitting to each leg. Make sure all tees point the same direction.
Connect the bottom shelf pipes between the tees. This creates your lower shelf frame.
Add elbows to the top of each leg pipe. Connect the top shelf pipes.
Place your wood boards on both levels. The top board sits flat. The bottom board rests on the lower pipes.
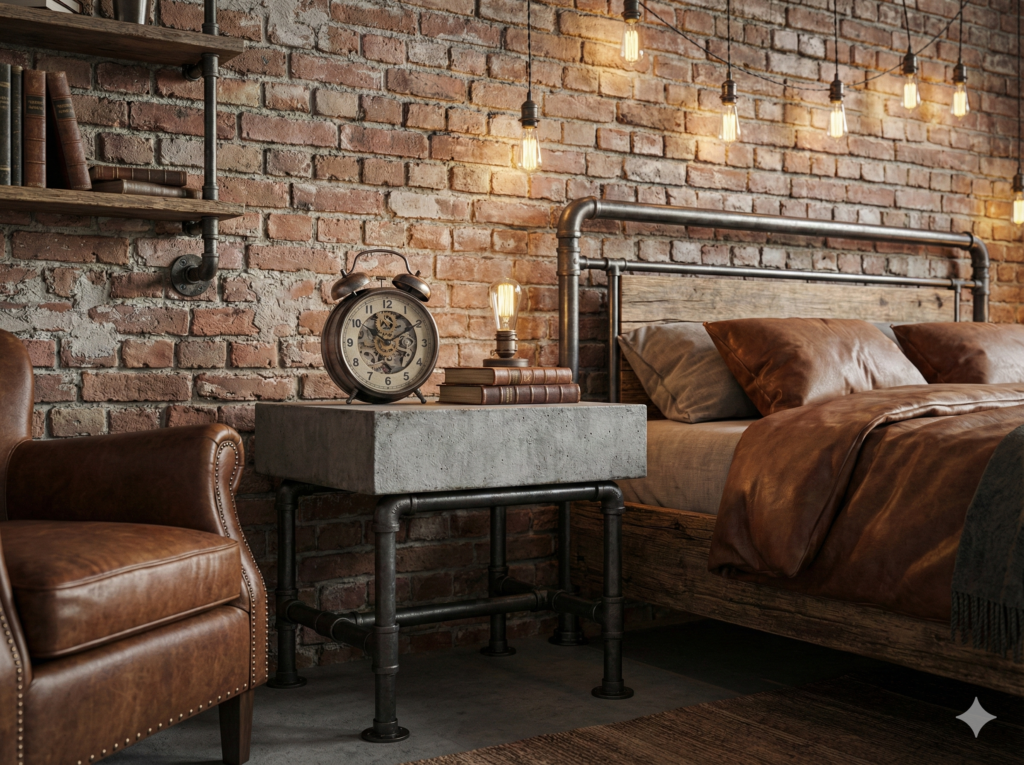
Customization Ideas
Add drawers by building a simple wooden box that slides into the frame.
Paint or stain the wood to match your bedroom furniture.
Use glass for the top shelf to create a modern look.
Add small hooks to the sides for hanging items.
Make an Industrial Pipe Lamp
A pipe lamp adds task lighting and style. This project lets you get creative with the design.
Simple Table Lamp Design
The easiest pipe lamp uses a straight vertical design. It looks like a mini street lamp.
You’ll need a lamp kit from any hardware store. These kits include the socket, cord, and switch. They cost about $10 to $15.
Shopping List
- One base flange
- One 12 to 18-inch pipe
- One elbow fitting
- One 6-inch pipe
- One cap or special lamp fitting
- Lamp kit
- Light bulb
- Lampshade
How to Build It
Thread the lamp cord through the bottom flange and up through the vertical pipe. This takes patience but it’s not hard.
Attach the base flange to a wooden board. This creates weight and stability.
Connect your vertical pipe to the base.
Add the elbow at the top. Attach the short horizontal pipe.
Install the lamp socket at the end. Follow the kit instructions for wiring. It’s just connecting a few wires with simple nuts.
Add your bulb and shade. Test it before final assembly.
Design Variations
Create a multi-bulb fixture by adding more elbows and branches.
Skip the lampshade for an exposed Edison bulb look.
Bend the pipes for a more artistic shape. This requires a pipe bender tool but creates unique designs.
Use copper pipe instead of black iron for a warm, shiny finish.
Build a Sturdy Pipe Curtain Rod
Curtain rods made from pipe never sag or bend. They hold heavy curtains easily.
Why Pipe Works Better
Regular curtain rods cost $30 to $60. They often bend in the middle with heavy drapes. Pipe stays straight and costs about the same.
The industrial look also coordinates with other pipe furniture in your room.
What You Need
- One pipe the width of your window (add 12 inches beyond the window frame)
- Two flanges
- Two end caps
- Wall screws
- Curtain rings or clips
Installation Process
Measure your window width. Add at least 6 inches on each side. This lets curtains stack without blocking the window when open.
Mark your flange positions on the wall. They should be 4 to 6 inches above the window frame and 6 inches beyond each side.
Mount the flanges to wall studs. Use a level. If you can’t hit studs, use heavy-duty wall anchors rated for at least 20 pounds each.
Screw your pipe into both flanges. Add the end caps for a finished look.
Hang your curtains using rings that fit over the pipe. Standard 1-inch inner diameter rings work with 3/4-inch pipe.
Pro Tips
Add a center support flange if your window is wider than 6 feet. This prevents any sag.
Spray paint the pipe before installing if you want color. Let it dry for 24 hours.
Use double rods for layered curtains. Mount two flanges on each side, one above the other.
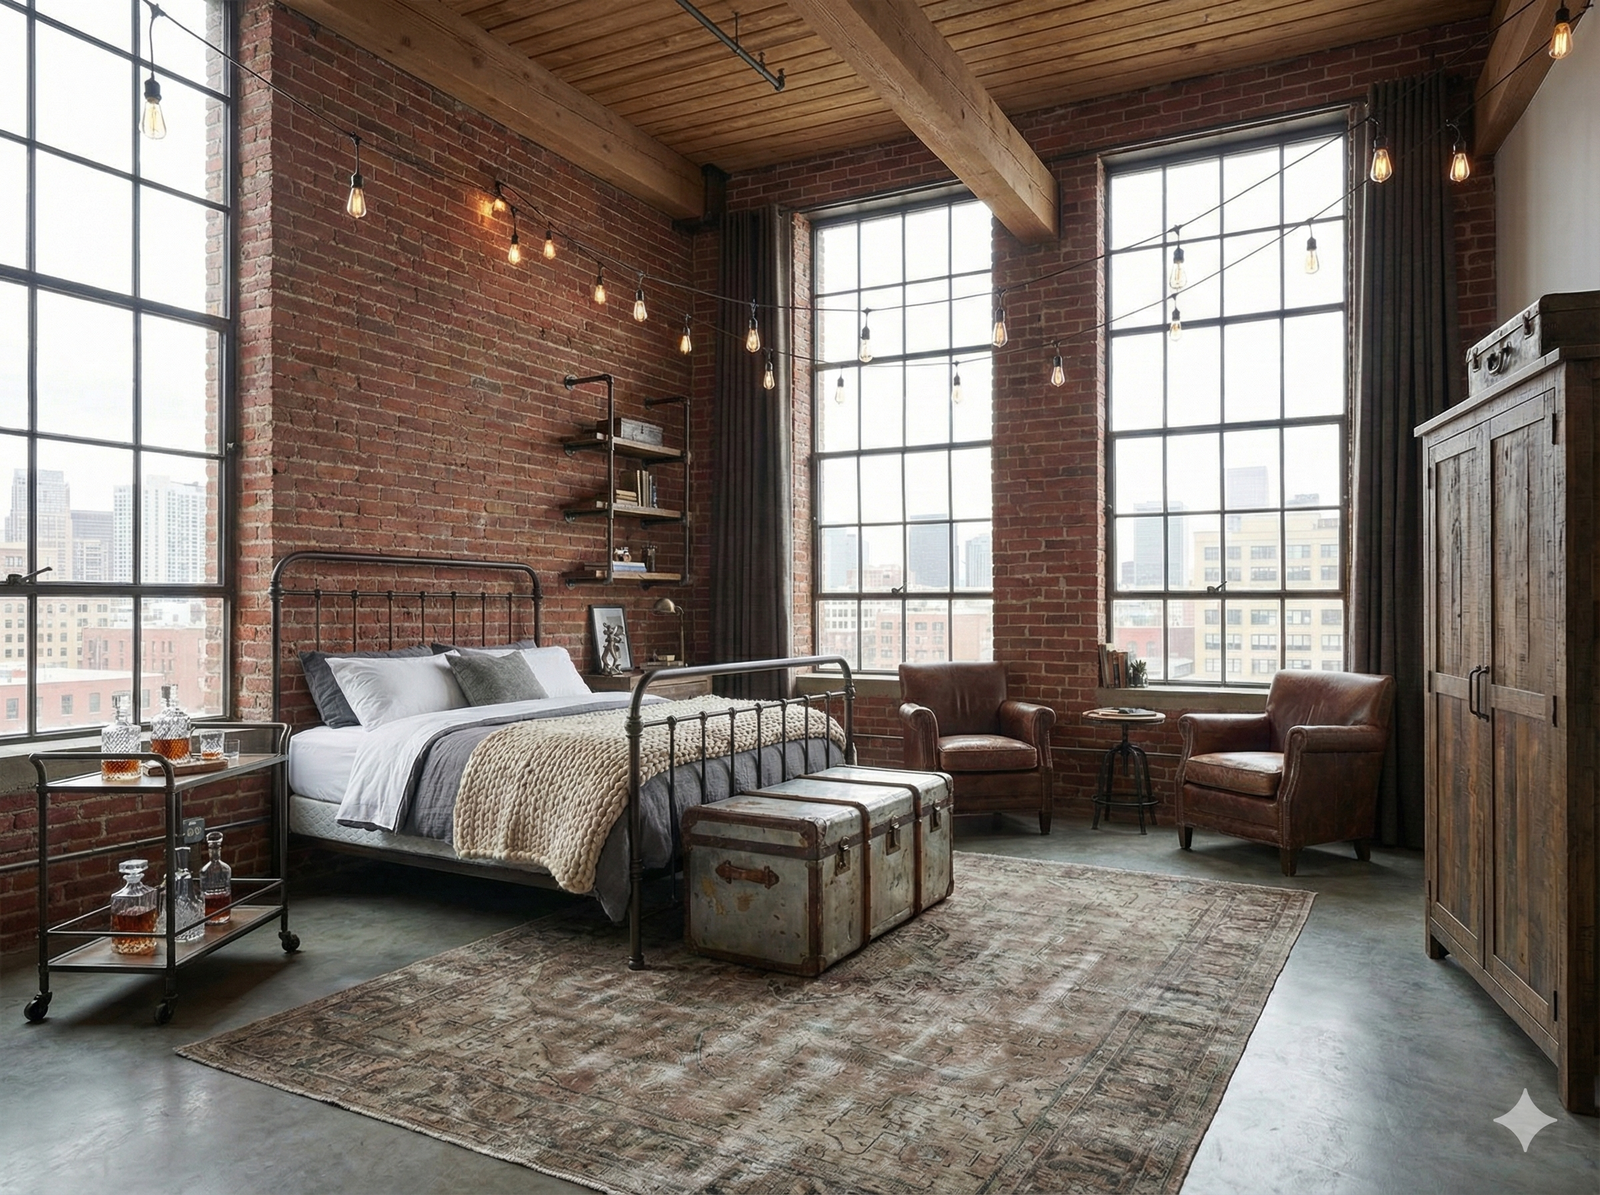
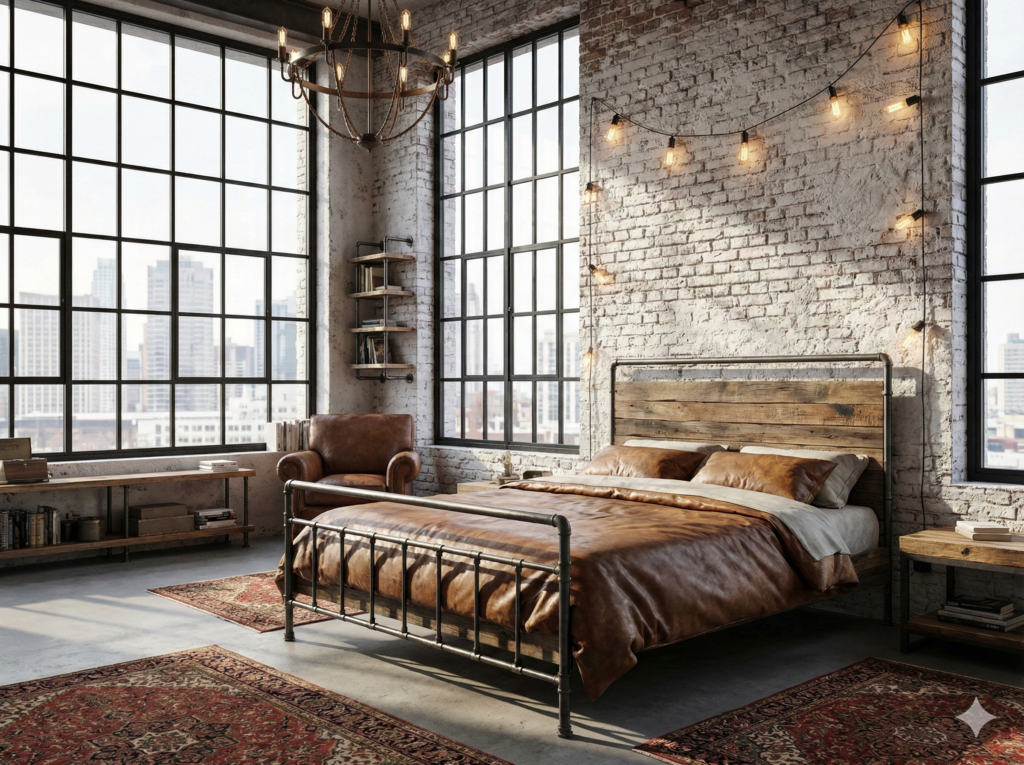
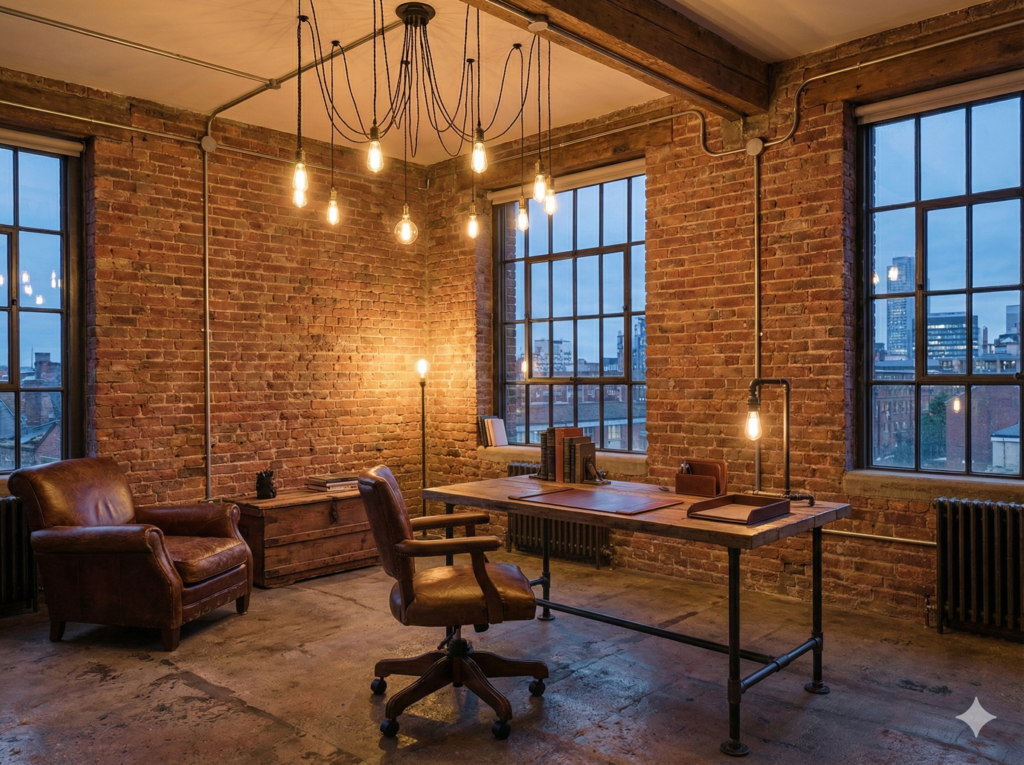
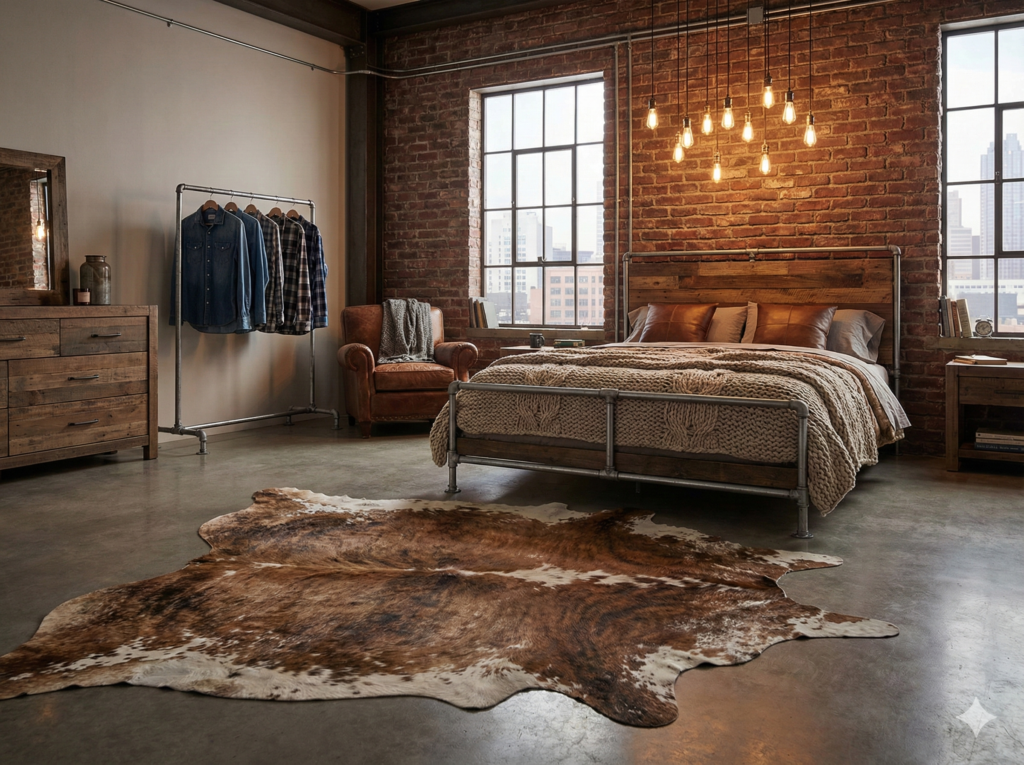
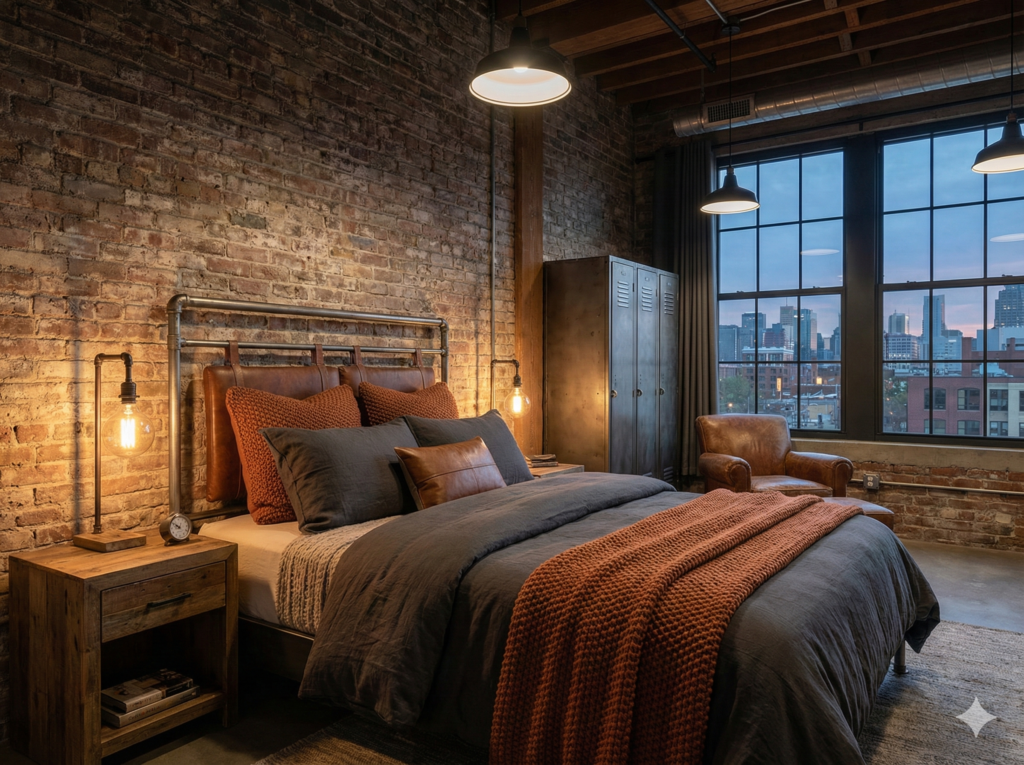
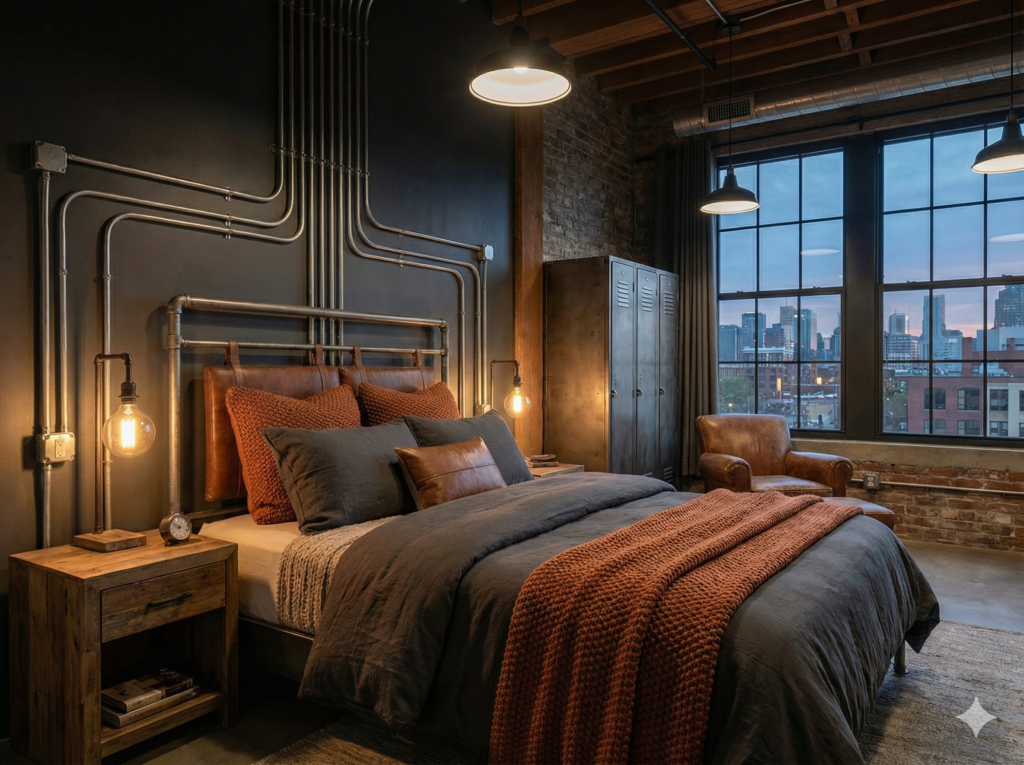
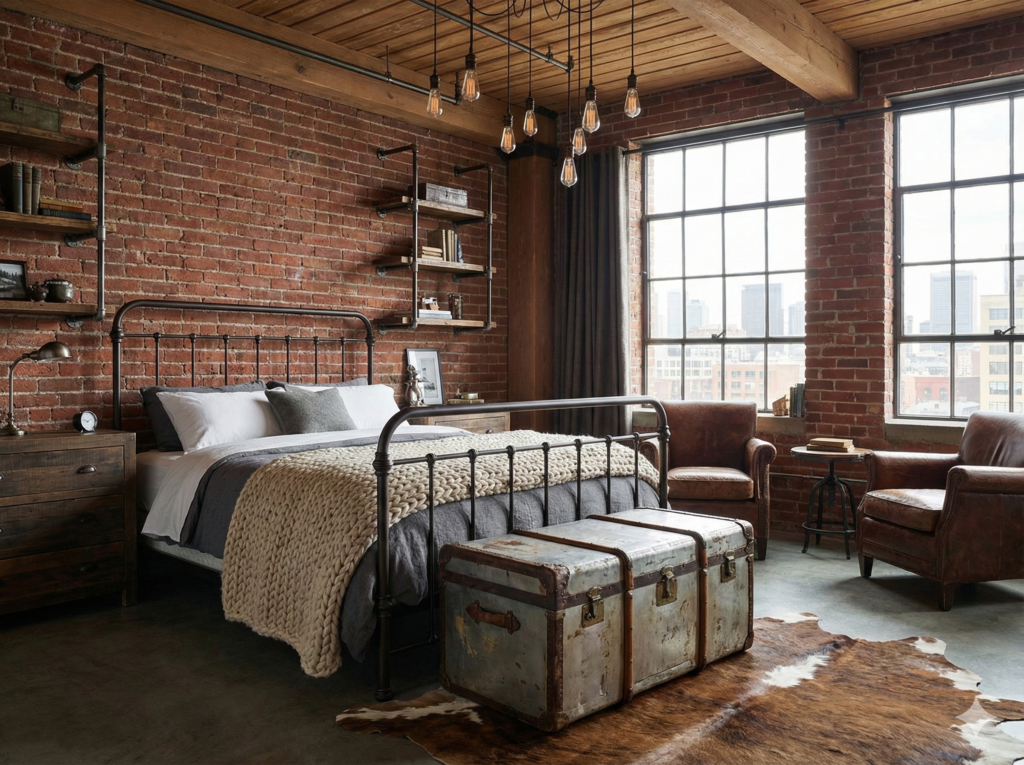
Craft a Full Pipe Bed Frame
A pipe bed frame makes a bold statement. It’s the centerpiece of industrial bedroom design.
This is the biggest project, but it’s still doable. Many people complete it in a weekend.
Planning Your Bed
Standard bed sizes:
- Twin: 39 x 75 inches
- Full: 54 x 75 inches
- Queen: 60 x 80 inches
- King: 76 x 80 inches
You’ll build a frame that supports a box spring or platform. The pipes create the structure. Wood slats or a platform hold the mattress.
Materials for a Queen Bed
- Eight 60-inch pipes (two sides, two head, two foot, two center supports)
- Four 80-inch pipes (side lengths)
- Sixteen 12-inch pipes (legs and supports)
- Eight floor flanges
- Multiple elbow and tee fittings
- Wood slats (1 x 4 inch boards)
- Wood screws
Building Steps
Start with the perimeter. Connect the long side pipes with the head and foot pipes using elbow fittings. This creates your rectangular frame.
Add legs at each corner. Use 12-inch pipes with floor flanges at the bottom. The frame should sit about 12 to 14 inches off the floor.
Build center support beams. Long beds need support in the middle to prevent sagging. Add one or two crossbars depending on bed size.
Create the slat supports. Add small pipes or wooden cleats along the inside perimeter. These hold your support slats.
Lay wood slats across the frame. Space them 2 to 3 inches apart. This supports your mattress.
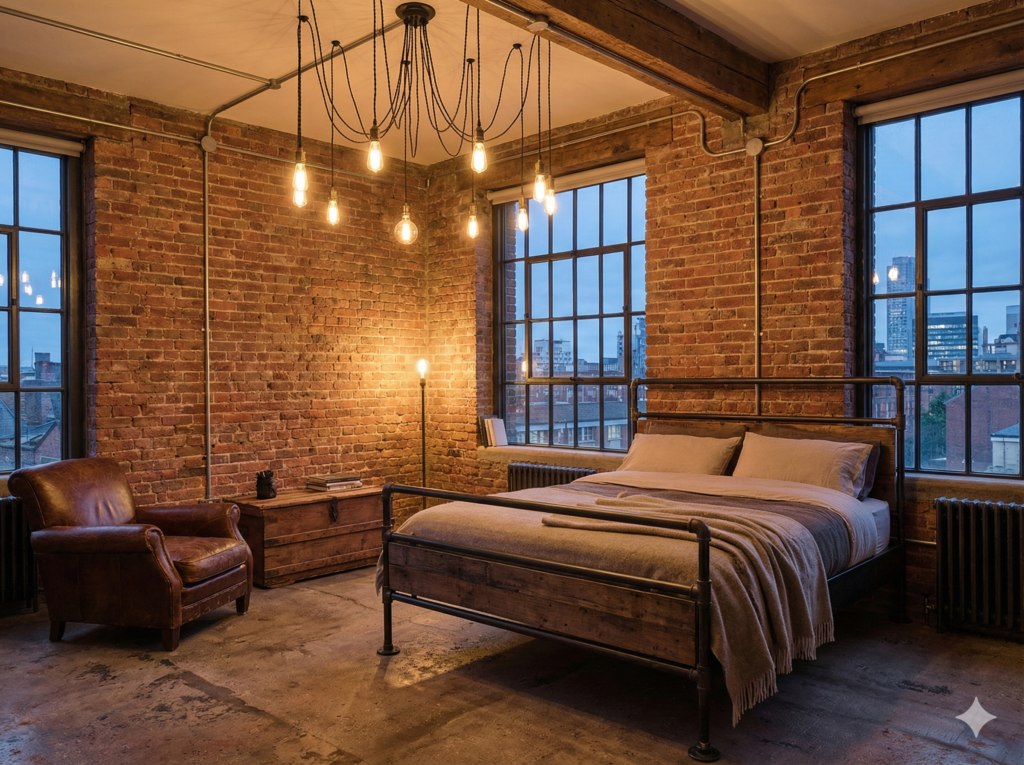
Important Considerations
This bed is heavy. Build it in your bedroom because moving it later is tough.
Use 1-inch diameter pipe instead of 3/4-inch for extra strength. Beds need to support a lot of weight.
Sand any rough spots on the pipes. You don’t want sharp edges near your mattress or bedding.
Consider adding a headboard. You can build one from pipes and wood or attach a separate headboard to the frame.
Tips for Working with Pipes Successfully
These tricks make your projects easier and better looking.
Dealing with the Oil Coating
New pipes come covered in oil. This protects them from rust during shipping. But it’s messy.
Wipe down all pipes with paper towels before you start. Get most of the oil off.
Then wash them with warm soapy water. Dish soap works great. Dry them completely.
Some people skip this step. But the oil makes paint not stick and can stain fabric or carpet.
Getting Pipes Cut to Size
Hardware stores will cut pipes for you. Many do it for free or for a small fee.
Measure twice before you go. Write down exactly what lengths you need.
If you’re cutting pipes yourself, you’ll need a pipe cutter tool. These cost $15 to $30. A hacksaw also works but takes more effort.
After cutting, you’ll need to thread the ends. Pipe threading kits cost $60 to $300. For most DIY projects, it’s easier to just buy pre-cut, pre-threaded pipes in standard lengths.
Preventing Rust
Black iron pipes can rust, especially in humid rooms.
Seal them after assembly. Use clear polyurethane spray or paste wax. This creates a barrier against moisture.
Wipe spills quickly. Don’t let water sit on the metal.
In bathrooms or very humid bedrooms, consider galvanized pipes instead. They naturally resist rust better.
Making Connections Tight
Hand-tighten first. Get everything lined up.
Then use your pipe wrench to snug each connection. You don’t need crazy force. Just firm and secure.
If a connection keeps loosening, add thread tape. This plumber’s tape (also called Teflon tape) creates a tighter seal. Wrap it around the threads before connecting.
Painting Your Pipes
Many projects look great with natural black pipes. But painting opens up options.
Clean the pipes first. Remove all oil and dirt. Let them dry.
Use spray paint made for metal. Rust-Oleum makes many colors. Apply thin coats. Two or three light coats work better than one thick coat.
Let each coat dry completely before the next. Follow the paint can instructions for drying time.
Popular colors include white (for a softer look), copper (warm and rich), gold (glam style), and matte black (even darker than natural).
Common Mistakes to Avoid
Learn from others who’ve gone before you.
Buying the Wrong Size
The biggest mistake is mixing pipe sizes. Stick to one diameter for your whole project. Usually, that’s 3/4 inch.
Also watch fitting sizes. A 3/4-inch pipe needs 3/4-inch fittings. This seems obvious but gets confusing at the hardware store with so many options.
Skipping the Planning Step
Don’t just start buying pipes. Draw your project first. Measure everything.
List every pipe length and fitting you need. Count carefully. It’s frustrating to get home and realize you’re missing a piece.
Not Checking for Studs
Wall-mounted projects need solid anchoring. Find the studs. Don’t rely on drywall anchors alone for heavy items like shelves full of books.
A stud finder costs $10 to $20 and saves headaches. Mark stud locations with painter’s tape before you start drilling.
Forgetting About Weight Distribution
Pipe shelves are strong, but don’t overload them. Spread heavy items across the shelf. Don’t pile everything in one spot.
For beds, make sure you have enough support beams. Queen and king beds need center supports to prevent sagging over time.
Not Measuring Your Space
Build for your actual room. That cool 8-foot clothing rack you saw online might not fit your bedroom wall.
Measure your space first. Then plan projects that fit properly with room to spare.
Styling Your Industrial Pipe Decor
The pipes are just the start. Here’s how to make everything look amazing together.
Mixing Materials
Industrial style works best with contrast. Mix the hard pipes with soft fabrics.
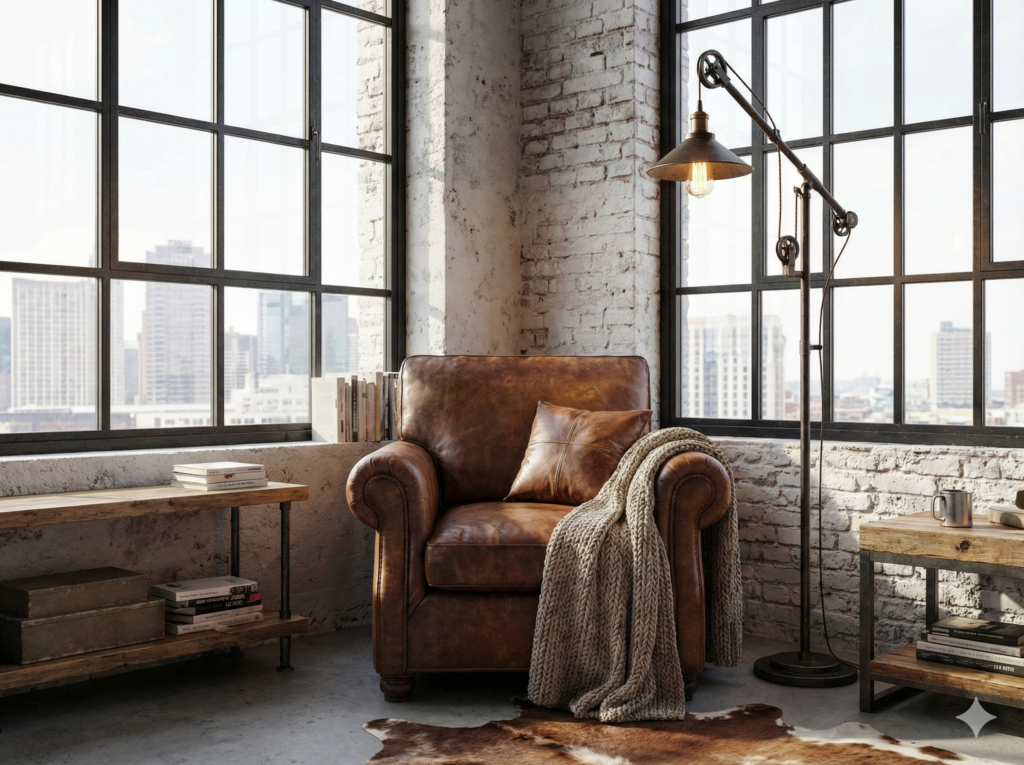
Pair metal furniture with plush rugs. Add lots of pillows and blankets to your pipe bed frame. Hang soft curtains from your pipe curtain rod.
Wood adds warmth to metal. Use wood shelves on pipe brackets. Choose wood tops for pipe tables. The combination looks balanced and inviting.
Adding Color and Texture
Industrial doesn’t mean boring. Add color through accessories.
Bright throw pillows pop against dark metal. Colorful art stands out on neutral walls. Plants bring life and green to the space.
Layer textures to create depth. Think soft knit blankets, smooth metal pipes, rough brick or wood, and fluffy rugs.
Keeping It Balanced
Don’t overdo the industrial look. If everything in your room is black metal, it feels cold.
Use the 60-30-10 rule. Make pipes 30% of your design. Balance with 60% neutral backgrounds and 10% accent colors.
For example, in a bedroom with a pipe bed frame and pipe nightstands, keep walls neutral. Add a soft headboard. Use colorful bedding and a cozy rug.
Lighting Matters
Industrial style needs good lighting. The dark metals can make a room feel dim without proper lights.
Layer your lighting:
- Overhead fixture (maybe a pipe chandelier)
- Task lighting (pipe desk lamps or reading lights)
- Ambient lighting (string lights or LED strips)
Edison bulbs look perfect with pipe fixtures. They have that vintage industrial vibe.
Connecting to Your Overall Style
Your industrial pipe pieces should fit your bedroom’s whole look.
In a modern room, keep pipe designs clean and simple. Straight lines work best.
For a rustic bedroom, pair pipes with reclaimed wood and vintage decor.
A boho room can handle more ornate pipe designs. Add curves and interesting shapes.
Even in a Valentine’s Day bedroom, pipe furniture provides structure while softer elements add romance.
Maintaining Your Pipe Furniture
Keep your projects looking great with simple care.
Regular Cleaning
Dust pipe furniture with a dry cloth. Do this weekly to prevent buildup.
For deeper cleaning, use a damp cloth with mild soap. Dry immediately to prevent water spots.
Don’t use harsh chemicals. They can damage any coating or paint on the pipes.
Checking Connections
Every few months, check that fittings stay tight. The wood in tables and shelves can expand and contract with humidity. This can loosen connections slightly.
Tighten any loose joints with your pipe wrench. Don’t over-tighten. Just snug them up.
Touching Up Finish
If pipes get scratched or dinged, touch them up.
For painted pipes, keep leftover paint for repairs. Dab on small amounts with a small brush.
For natural black pipes, use black paint markers to hide scratches.
For sealed pipes, reapply clear coat as needed. This maintains rust protection.
Protecting from Moisture
Keep drinks and plant pots on coasters or trays. This prevents water rings and rust spots.
In humid weather, run a dehumidifier in your bedroom. This protects both your pipe furniture and other items from excess moisture.
Where to Buy Materials
You have several good options for buying pipe and fittings.
Local Hardware Stores
Home Depot and Lowe’s carry basic pipe and fittings. You can see and touch items before buying. Staff can help with questions. According to the U.S. Department of Energy, shopping locally also reduces transportation emissions.
Smaller local hardware stores often have helpful staff with more time to assist DIY projects.
Prices at big chain stores are competitive. Expect to spend slightly more than online but you get items immediately.
Online Retailers
Websites specialize in pipe furniture supplies. They offer more variety in fittings and finishes.
Shopping online lets you compare prices easily. You can also find kits with everything needed for specific projects.
The downside is shipping costs. Pipes are heavy, so shipping adds up. Also, you can’t see items before buying.
Specialty Pipe Suppliers
Companies like PIPE DECOR and Simplified Building focus specifically on furniture-grade pipes.
These suppliers offer:
- Pre-cut lengths
- Specialty fittings not found at hardware stores
- Design help
- Project kits
- Higher quality finishes
They cost more than hardware store pipes but save time and offer unique options.
Budget-Friendly Project Ideas
Want the industrial look but watching your wallet? These projects keep costs low.
Start Small
Begin with one accent piece. A single pipe shelf costs $40 to $60. This lets you test the style without big investment.
A pipe curtain rod is another affordable first project. You’ll spend about the same as a regular curtain rod but get better quality and style.
Use What You Have
Look at your current furniture. Can you add pipe legs to an existing table? Replace regular shelf brackets with pipe ones?
These small updates add industrial touches without building everything from scratch.
Shop Sales and Secondhand
Check for damaged or returned pipes at hardware stores. They often sell them at discount. Small scratches don’t matter if you’re painting anyway.
Look at salvage yards or Habitat for Humanity ReStore locations. Sometimes they have pipe materials for less.
Buy during sales. Hardware stores have sales on building materials several times per year.
Choose Simple Designs
Complex projects use more materials. Keep designs straightforward to save money.
A basic three-pipe clothing rack costs less than an elaborate shelving unit. Both look great, but one stretches your budget further.
DIY the Wood Parts
Buy raw lumber and cut it yourself instead of purchasing pre-made shelves. A local home improvement store will usually make cuts for free or a small fee.
Sand and finish the wood yourself. This saves money compared to buying finished pieces.
Safety Considerations
Stay safe while building your projects.
Wear Protection
Use safety glasses when cutting pipes or drilling holes. Metal and wood pieces can fly.
Wear work gloves when handling new pipes. The rough threads and oil can irritate skin.
Use a dust mask if you’re sanding wood or cutting pipes. You don’t want to breathe in particles.
Secure Heavy Items
Mount wall shelves to studs, not just drywall. A shelf full of books weighs a lot.
Use appropriate wall anchors if you can’t hit studs. Get anchors rated for the weight you’re hanging plus extra for safety margin.
Test Stability
Before putting full weight on furniture, test it. Sit on the bed frame before adding the mattress. Put a few books on the shelf before loading it up.
Wiggle things gently to check for wobbles. Tighten any loose connections.
Be Careful with Tools
Power tools need respect. Read instructions before using drills or saws.
Keep fingers away from moving parts. Let blades stop completely before setting tools down.
Lifting Heavy Pipes
Long pipes and assembled pieces get heavy. Lift with your legs, not your back.
Ask someone to help with big projects like bed frames. Two people make assembly safer and easier.
Real Stories from DIY Builders
Hearing from others who’ve done these projects helps set expectations.
Sarah’s Bedroom Makeover
Sarah built pipe shelves and a nightstand for her bedroom. “I was nervous because I’d never done anything like this. But the pipes just screw together. It was actually fun. My favorite part is telling people I made it myself.”
She spent about $150 total for both projects. “Way cheaper than buying furniture that looked similar. Plus mine fits my space perfectly.”
Her advice? “Take your time measuring. I had to make two trips to the hardware store because I measured wrong the first time. But even with that, it still only took one weekend.”
Mike’s Bed Frame Journey
Mike built a king-size pipe bed frame. “It took longer than I expected—about 8 hours total. But I saved at least $600 compared to buying one.”
He learned some lessons. “Use bigger pipes for beds. I started with 3/4-inch but upgraded to 1-inch for better strength. Also, build it where it will live. This thing is heavy!”
His bed has lasted three years with no issues. “It’s solid as a rock. No squeaking or wobbling. Best furniture project I’ve done.”
Lisa’s Rental-Friendly Solutions
Lisa rents her apartment so she can’t drill into walls. She made freestanding pipe furniture instead.
“I built a clothing rack and a shelf unit that both stand on the floor. When I move, I can take them with me or take them apart easily.”
She painted her pipes white to match her room’s softer aesthetic. “People don’t even realize it’s made from plumbing pipes. They think I bought expensive industrial furniture from a fancy store.”
Troubleshooting Common Issues
Problems happen. Here’s how to fix them.
Pipes Won’t Tighten
If fittings won’t tighten fully, the threads might be damaged or cross-threaded.
Back off completely. Clean the threads. Try again, making sure the fitting starts straight.
Use thread tape if connections still feel loose. Wrap it clockwise around the threads.
Projects Wobble
Check that all legs are the same length. Even a small difference causes wobbling.
Make sure all connections are tight. Use your wrench on every joint.
Add felt pads under floor flanges. This helps with uneven floors and protects flooring.
Rust Spots Appear
Wipe the area clean and dry. Sand off the rust with fine steel wool.
Apply rust converter if the rust is deeper. This stops it from spreading.
Seal the area with clear coat or touch-up paint to prevent future rust.
Paint Chips or Peels
This usually means the pipes weren’t cleaned well before painting.
Strip the paint where it’s peeling. Clean thoroughly. Repaint with proper metal paint.
Use a primer made for metal before your top coat. This helps paint stick better.
Shelves Sag
You might have too much weight in one spot. Redistribute items.
Check that pipes are thick enough. Upgrade to 1-inch pipes for heavy loads.
Add more support brackets or center supports to long shelves.
Taking Your Skills Further
Once you’ve mastered basic projects, try more advanced builds.
Multi-Tier Shelving Units
Create floor-to-ceiling storage with multiple shelf levels. This uses the same techniques but on a bigger scale.
Plan carefully for weight distribution across all levels. Use more vertical support pipes for tall units.
Desk and Workspace Areas
Build a full desk using pipes for the base and wood for the top. Add keyboard trays or monitor stands using the same system.
Consider height-adjustable designs by using different length pipes for different working positions.
Room Dividers
Use pipe frames with fabric or wood panels to divide large bedrooms into separate zones.
This works great for studio apartments or shared bedrooms where you want some separation.
Murphy Bed Frames
Advanced builders can create pipe frames for fold-away beds. This requires careful planning and strong mounting.
The pipe frame holds the bed while adding style when it’s folded up against the wall.
Final Thoughts
DIY industrial pipe bedroom decor brings style and function together at a price that makes sense. You don’t need special skills. You don’t need fancy tools. You just need some pipes, fittings, and a few hours.
Start with one simple project. A clothing rack or shelf gives you confidence for bigger builds later. Each project teaches you more about working with pipes.
The industrial look works in any bedroom. It brings that loft apartment vibe even if you live in the suburbs. The dark metal creates contrast and visual interest. And everything you make is custom-sized for your exact space.
Your bedroom should feel like yours. Making your own furniture adds personality that store-bought pieces can’t match. When friends ask where you got that cool bed frame or those shelves, you get to say “I made them.”
The money you save can go toward other bedroom upgrades. Better bedding. New artwork. Whatever makes your space feel perfect.
So grab your measuring tape and head to the hardware store. Your industrial bedroom transformation is just a weekend away. And once you finish that first project, you’ll be hooked. Welcome to the world of DIY pipe furniture. Your bedroom (and your wallet) will thank you.
Ready to start your first pipe project? Pick something simple from this guide and give it a try. You’ve got this!